
Macro photography encourages you to get up close and personal to your subject, whether it’s an eight-legged, hairy arachnid or a cute little bumble bee covered in pollen. The word macro means big, which is kind of ironic because the subjects are usually tiny, but macro photography is about making images with extremely fine detail that reveal the microscopic world right under our noses.
It can also be a fun way to slow down and explore your own backyard, and I don’t mean pack a camper van and set off for a nice coastal drive, I mean literally go out into your backyard and take pictures of bugs and caterpillars.
Before you delve into the world of macro photography though, there are a few things you should consider. We’ve put together a list of the best tips and tricks as well as some hints to help you make the most of the little things in life.
 |
| A stunningly vibrant macro shot with a Ladybird beetle captured by Jill Heyer. |
How Close is Too Close?
Once you find a subject that would make a good macro shot, the first thing you’re going to want to do is get your camera as close as possible, right? Macro is all about capturing an image that fills the frame with intricate detail and this is where a tiny bit of lens knowledge can help avoid blurry shots, missed opportunities and general macro-related sadness.
Every lens has a physical limitation called a minimal focus distance, which is a technical way of saying “This is as close as you can get and still focus on your subject”. You may have seen this number printed on the side, front or bottom of your lens. It might look like the highlighted part of the lenses below.
The part you’re looking for is the measurement in metres. So, for the first lens it is 0.28m or 28cm, for the second it’s the number in the middle, so it is 0.185m or 18.5cm, the top number on this lens is the magnification ratio (we’ll get into that in a bit), and the bottom number is the distance in feet, and finally the last lens has a minimum focal distance of 0.19m or 19cm.
 |
| A comparison of different places you might be able to check to find your lenses minimal focus distance. |
If your subject is closer than the minimal focus distance of the lens, no matter how much you spin the focus ring it just won’t look sharp. If you’re using autofocus (which is not really recommended for macro) you'll hear the autofocus motor hunting back and forth trying in vain to focus. By simply moving your camera further back you should be able to focus and get the shot.
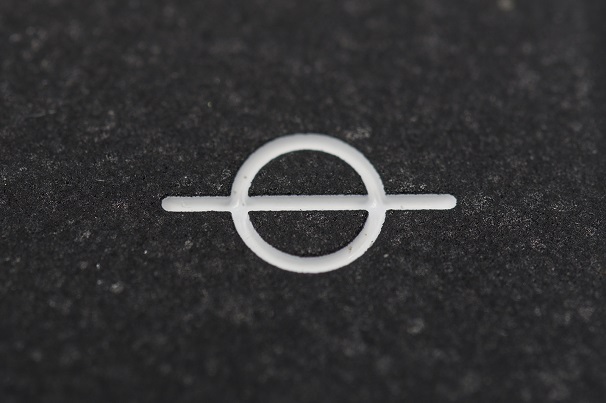
Fun Fact: The minimal focus distance is measured from the sensor plane and is indicated with this symbol “Φ”. In camera talk this is called the focal plane mark or the film plane mark. Feel free to annoy your friends and family with that priceless piece of trivia information.
 |
| A macro shot of the focal plane mark on an A7r Mark III mirrorless camera |
Keep in mind Nikon call their macro line-up micro lenses, which is technically accurate, even if it is more confusing for everyone else.
Another thing to note is that some manufacturers refer to a working focus distance rather than a minimal focus distance. What is the difference? Well working distance is measured from the end of the lens, where focal distance is measured from the focal plane, or in other words from the sensor.
1 to What? – Magnification Ratios
Many lenses claim to have a macro ability but only those with at least a 1:1 magnification ratio can be considered a “true” macro lens. So, what is a 1:1 ratio and what does it mean? Is it a made-up term to make us buy more expensive lenses?
Short answer? No, having a 1:1 ratio lens allows you to get significantly closer and still get the shot in focus, making them super useful for macro shooters. Get your hands on a macro lens at any of our stores and you'll quickly realise how much closer you can get with a 1:1 lens.
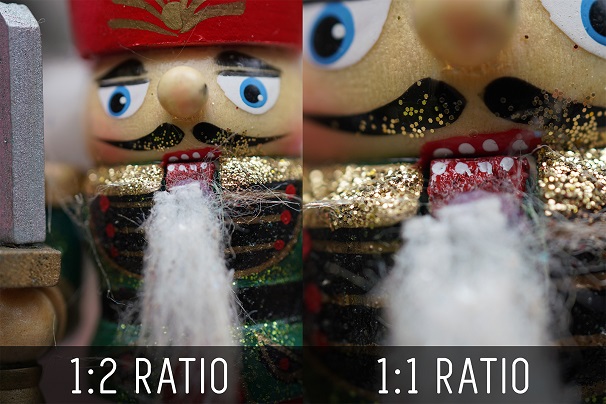 |
| A 50mm lens focused at 19cm with a 1:2 ratio compared to being focused at 16cm with a 1:1 Magnification Ratio |
Long answer? Okay you asked for it, if you’re still reading this I’m going to assume you want all the gritty confusing details. If you’re happy to know the “why” without knowing the “how” why not skip ahead to the next tip.
A 1:1 magnification ratio means that your subject will be projected onto your sensor at the exact same size as real life. For example, if you have a 1-inch sensor and you take a picture of a ruler you will be able to fill the frame from left to right with 1-inch of the ruler and be able to get the shot in focus as long as it's at exactly the minimum focal distance.
This means with a 1:1 lens you're creating a shot with a 1x magnification, but there are lenses with a greater magnification ratio. The Lawoa 60mm Ultra-Macro Lens has a magnification ratio of 2:1 meaning it projects an image twice as big as real life onto the sensor while the Canon MP-E 65mm has a massive 5:1 magnification ratio making it more microscope than lens.
Steady as it Goes – Using a Tripod
One of the things you’ll notice shooting macro, is that the depth of field is shallow, and we are talking crazy shallow with a tiny sliver of focus that can bounce around every time you inhale. This ultra-blurry depth of field makes it almost impossible to shoot handheld.
But wait a second, can’t I just close down my aperture to like f/16 or f/22 and get the whole scene in focus? I like your enthusiasm but unfortunately at these magnifications, even using higher f-stops you’re going to struggle to get the whole shot in focus. Not to mention that by stopping down you’ve just made your shot darker, which doesn't help your cause.
Most Macro shooters will shoot at these large f-stops as a standard but if you want to bend the law of physics to get wild in focus shots with a very deep depth of field I would recommend reading our Introduction to Focus Stacking Blog, you will still need a very important extra piece of kit though to get really steady shots.
Most Macro shooters will shoot at these large f-stops as a standard but if you want to bend the law of physics to get wild in focus shots with a very deep depth of field I would recommend reading our Introduction to Focus Stacking Blog, you will still need a very important extra piece of kit though to get really steady shots.
 |
| A shot of a tripod, admittedly pointing in the wrong direction for macro. Photo by Andre Hunter |
The trusty tripod is used by most macro photographers to remove vibration and control their composition. So, which one is best for macro? Essentially any tripod will work but one with a centre column that can be set horizontally like the Manfrotto 190 Go or the 290 Series are best. Some tripods like the Vanguard VEO 204AB offer 180° of movement to position the centre column, allowing your camera to get into more weird and a wonderful positions than a yoga teacher showing off.
Hot Handheld Hint: If you don’t really want to shoot with a tripod, you can try shooting with a fast drive mode like continuous burst combined with a fast shutter speed of at least 1/200th of a second to reduce blur from hand shake. A fast shutter might cause the shot to become darker, so you may need to raise the ISO, which could result in grainier images but you’ll have an improved chance of getting a sharp shot. Also a fast SD card is essential when shooting in “Spray-and-pray” mode to ensure you can keep taking photos without waiting for the camera to offload your shots.
Get Focused and Stay Focused
If you’re all about getting your lens as physically close to your subject as possible, and let’s be honest who isn’t when shooting macro, you’ll want to lock your focus ring at your minimal focus distance setting. But how do you change your focus if you can’t change the lens settings?
Well, you need to move the entire camera closer or further away from your subject to focus. Sounds annoying, right? Well it is, but there are some nifty tools called Focusing Rails like the Kiwifotos FC-1 that allow you to make ultra-fine adjustments to your camera position in order to adjust focus and framing.
 |
| The Kiwifotos Focusing Rails in use capturing an image of a rose. |
Lighten the Mood.
The microscopic world is infinitely interesting, with a never-ending list of subjects to capture, but unfortunately there is one finite resource that you'll discover is in short supply, and that is light.
Shooting with stopped down apertures to help achieve a deeper depth of field, or using Extensions Tubes to hack your minimal focus distance all have a downside and that is a dramatic reduction in the amount of light that hits your sensor.
This means you’re going to end up with darker shots unless you can find a way to effectively combat the loss of light. Luckily in this modern age adding extra lighting to your shot is easier and more cost effective than ever before. There are a wide range of Macro Flashes, Ring Lights and LED Lighting available for almost every type of camera.
There are some really specific macro lighting tools out there, for example the Laowa KX-800 is a flexible twin flash with a built-in LED focus light that allows you to position your lighting exactly where you want it.
It is a manual flash, so keep in mind that the final shot will look different to how it looks through the viewfinder and keep your shutter speed slower than 1/250 for most camera models. Whack it onto your camera and you even might start to feel a slight affinity for some of your subjects.
It is a manual flash, so keep in mind that the final shot will look different to how it looks through the viewfinder and keep your shutter speed slower than 1/250 for most camera models. Whack it onto your camera and you even might start to feel a slight affinity for some of your subjects.
 |
| The Laowa KX-800 flexible flash look like something out of a bad 80's horror film but can add extra light to your shot. |
Want More?
There is often more than meets the eye with macro photography, and like any skill the more you do it the quicker you will level up and improve.
The tips and tricks we mentioned are by no means comprehensive, there are a lot of complexities with macro and even more specialised gear top understand like tilt-shift macro lenses, Canon lenses with built-in LED lights, or even macro lenses for your mobile phone.
The tips and tricks we mentioned are by no means comprehensive, there are a lot of complexities with macro and even more specialised gear top understand like tilt-shift macro lenses, Canon lenses with built-in LED lights, or even macro lenses for your mobile phone.
February is Macro Month at Digital Camera Warehouse. If you want more information about macro photography techniques pop into one of our stores because we have exclusive offers, hands on demonstrations and more.