Vivid is underway once again in Sydney, it’s great excuse to grab your camera and see the iconic Opera House as well as the Sydney Harbour Bridge brought to life with lights.
Once the sun dips below the horizon it is an ideal time to experiment with night photography and explore the city in search of creative inspiration.
Whether you’re a seasoned enthusiast or just starting to explore your new camera, we can all agree there’s just something about taking photographs at night.
Of course, with darkness and inspiration comes a whole new challenge; how to capture it.
 |
| The Sydney Harbour Bridge lit up for Vivid. |
The advice you get can vary and, depending on who you ask, it can be kind of daunting. But fear not! We’re here to shed some light on this interesting little topic.
The short answer is: If you have a camera with some manual control options, and a tripod you should be able to capture some great shots at night.
Let’s Set the Scene
First things first, we need to put our camera into one of the following modes with the control dial.
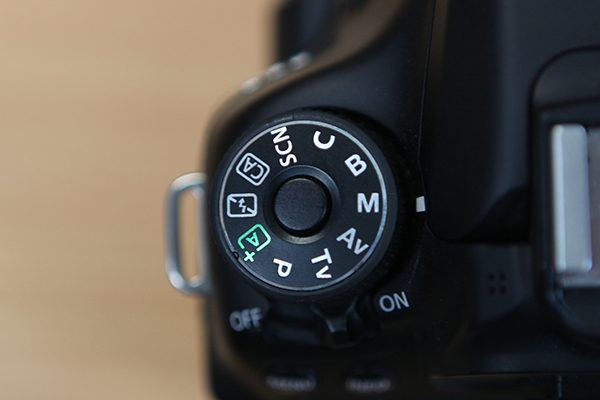 |
| The mode dial on a Canon 70D |
M (Manual Exposure) mode or S (Shutter Speed Priority) mode, this is the TV (Time Value) mode on Canon and Pentax cameras.
Slow that Shutter Speed
As the name suggests, your shutter speed controls how quickly the shutter opens and closes, in other words; how long your camera takes a photo for.
It can range from a fraction of a second to 30 seconds or longer. A picture captured with a slow shutter speed is a long exposure.
 |
| Movement can create light trails with long shutter speeds, like this ferry in front of the Opera House at Vivid |
At night, we need to capture as much light as possible, so slow shutter speeds are essential because they allow more light to collect on the sensor.
There is a downside to using long shutter speeds though, even the slightest camera movement can result in image blur. This makes slow shutter speeds less-than-ideal for handheld shooting.
Hold your Composure
Shooting handheld can be tough. Some cameras and lenses have image stabilisation or vibration compensation built-in to make it a little easier. Turn this on to for better handheld shots.
If you don’t have stabilisation and you're using a standard kit lens zoomed out, chances are you probably won’t get a sharp shot with a shutter speed slower than 1/30th of a second.
That said, everyone’s a little different, some people can held their camera steady long enough to get a sharp shot with a shutter speed as slow as 1/4 of a second.
 |
| A 24mm focal length shot handheld with a shutter speed of 1/4 is passable, but at 1 second blur comes into play. |
How slow can you go? We highly recommend you try this with friends, it can get pretty competitive!
What is Better Than Two Legs?
Night photography becomes a lot easier once you add a particular piece of gear to your kit.
You can probably guess what we’re going to suggest, yep it’s the humble 3-legged tripod. Be wary of anyone trying to sell you a two legged tripod though, they don’t exist for a reason.
A tripod allows you to compose your shot and then keeps your camera steady allowing you to use much slower shutter speeds than you can when shooting handheld.
 |
| Shooting with a tripod can dramatically increase the sharpness of your image when using long shutter speeds. |
There are lots of different things to consider when getting a tripod like do you prefer an aluminium or carbon fibre construction, and what kind of tripod head do you want.
Would you prefer a ball head that is quicker to setup or a 3 axis head that allows you to frame your shot with more precision.
You can find out more about choosing the right tripod here in our blog.
Strange but True: When on a tripod you should turn image stabilisation off, which seems wrong but trust us you’ll get sharper shots with your vibration reduction turned off.Image stabilisation is designed to move your sensor or lens to compensate for bumps and shakes but when your camera is locked down and stable on a tripod this can actually do more harm than good.
Open the Aperture
Another way to get more light on the sensor is to open the aperture or f-stop of your lens, by selecting the smallest or lowest f number available on your lens.
Each lens is different and most kit lenses that come with DSLRs have a max aperture of around f/3.5 which is nothing to sneeze at, but the best lenses for low-light usually have a maximum aperture of around f/2.8 to f/1.4 like these lenses from Nikon and Canon.
 |
| The aperture of a lens is the iris inside that expands and contracts to control light levels. |
By setting the aperture on your camera to the lowest f-number the lens can open wide, just like the iris in your eye.
To learn more about aperture check out this previous DCW blog for more info.
Increase the ISO
Let’s say you’re shooting handheld so you can’t set the shutter speed any slower and your lens aperture is already wide open, don’t despair there is another option to get brighter shots.
You can increase the ISO, which ramps up the light sensitivity of your camera by increasing the voltage of the image sensor.
A general rule of thumb when setting your ISO is the lower the better, but in a pinch, it can deliver a boost.
The downside to ISO is that the higher you crank it, the more noise and grain your image will show.
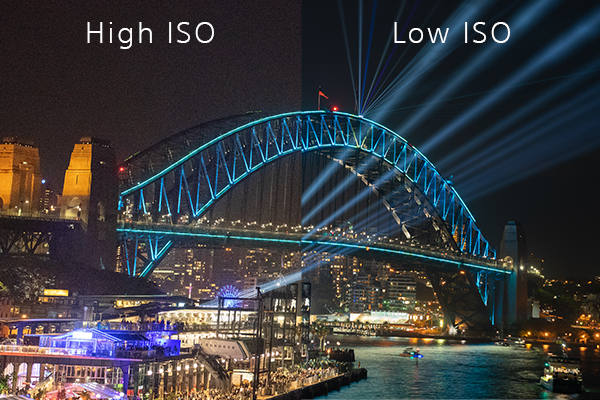 |
| A high ISO setting can create noise in your image. |
High ISO does not a good image make, but sometimes you may have to compromise a little on image quality to get the shot.
 |
| Your image might look fine on the back of your camera but zoom in to check for grain. |
Hands off the Merchandise
Once you’ve got some exposure settings your happy with and you’ve spent some time lining up the perfect composition it’s time to take the picture, but not so quick, there is one more thing to think about.
When shooting a long exposure even the smallest bump, like when you press the shutter button, can be the difference between a stunning nightscape of the city lights and a smudge of blurry lights.
We recommend using a cable release or remote, so that you can trigger your camera without touching it.
You can also use the timer on your camera, which should be located somewhere on your camera’s drive function if you don’t mind waiting.
Extra Tips and Equipment
Manual Focus – Your camera's autofocus will probably struggle in the dark, so you might have to switch to manual focus. When focusing manually the live view mode of your camera combined with a focus magnifier function can be super useful. Check your camera’s manual to see how to access this feature if you have it.
Lens cloths – Pack, at least 2 or 3 in your kit, especially if you’ll be out for a few hours, I kid you not. Often when you’re out after sunset, you’ll notice the temperature drop. So will your lens. This can be accompanied by increased ambient moisture, so condensation may build-up on your front element.
Be sure to check and dry your lens frequently, especially when doing long exposures where every second counts. (Seriously, it does.)
Extra Batteries – It’s a good idea to grab a spare battery when you first buy your camera, but it’s especially important when photographing at night.
Long shutter speeds chew through batteries much faster than normal and it’s not just the long exposures. Cold temperatures can also drain battery life, dramatically decreasing the amount of time you’ll get to take photos.
Hot Tip: To prolong battery life in cold weather, keep any spare batteries in your pockets or close to body heat. The extra warmth will help maintain their charge until you need them.
That said, remember to dress warmly! No matter what type of photos you’re aiming to take, you will NOT enjoy yourself if you’re cold.
Never forget the scarf. Layers are your friend. Gloves are nothing to be ashamed of and a nice beanie goes a long way.
What’s Next?
Once you’ve mastered these basics of night photography then you can let your imagination run wild and you start exploring creative techniques like zooming while the camera is capturing a long exposure for an explosion of lights and colour.
You could even bring your own lights or props to add some extra elements to a scene. Like this shot captured during one of our DCW walking tours.
This is only the beginning of your low-light photography journey, once you have an understanding of night photography and low exposures you'll be in an great position to start experimenting with astrophotography to capture the stars, milky way and more.
